 TheFreeBird
How to start a blog | Simple Guide
Since i started the website two years back the most common question that i keep on getting is “how to build the travel blog website”, ” how to be a blogger?”, ” How to start a blog?“. I am a trekker and can also be called a traveller but definitely not the strongest tech person around. Being a non – technical guy it took me some time to get hold of the right knowledge . So i thought to put it down in a simple manner for common people like me to understand and live their blogger dream. Be the digital nomad & start a blog.
Should I Quit My Job For Mountains / Travelling
These are the blog basics you will understand in the blog below.
- Different Blogging Website types: Free Ones & Paid ( self hosted) ones
- Why you should go for Paid Website
- Basic process for Creating a paid website
Click Here to Skip the basic website concepts & start building a simple wordpress website
This is a 20 Minute read.
Place a pillow behind your back & grab that cold beer !!!

Beer is for after the blog, otherwise we both know where this will go.
Free & Paid ( Self hosted ) blogging Platforms
FREE BLOG: There are free blogging websites where just need to sign up and within 2 minutes you can start blogging. The famous options for these are WordPress.COM & Blogger
PAID BLOG WEBSITES: Instead of the free options there are other options to set up your websites based on WordPress.ORG, WIX, Shopify etc which provide more freedom than the free platforms.
Bro Tip:
WordPress.COM & WordPress.ORG are two different sites. Re-read the above paragraph to prevent confusion
Why go for Paid Platforms
The disadvantages of Free Blog Platforms are few and prominent for anyone intending to be a professional blogger. For doing it as a timepass, free ones are the best ones.
- Name: Free platform blogs come with ugly domain names like Yourname.Wordpress.com , Yourname.freeblogsite.com instead of Yourname.com . ( There are paid options available with some to get cleaner domain names)
- Design: Also there is little control on the designing element of the website. The existing designs are good but not upto professional standards.
- Data: There is no control over the data. You have the website with you but the control lies with the provider who can delete the website under certain cases without your say in it.
- Monetisation: There are very few options available to earn money for yourself
All the above problems are sorted with a self hosted platform which gives total control & freedom to whatever you want to do. The free options are only good for a amateur blogger. Hence if you have bigger ambitions with your blog its necessary to go for a Self Hosted Platform
Basics of a Paid Platforms
Following options are available to build your paid websites:
- Code it: Build you own website using coding with html, php, css , javascript etc
- Content Management Systems (CMS): Install CMS + Themes . No coding required. Famous CMS are WordPress.ORG, Drupal , Joomal etc (Open Source Technology)
- Website Builder: like WIX, Weebly etc dont require any installation , just sign up , select one of the thousand themes and start customising your website by drag and drop functionality
Which Option for Paid Platforms Should i Use
If you are a technical guy you can create a website by coding based on CSS, php , html. javascript etc. and that would be the best way to go. However since you reading this i assume you are not and i will compare the remaining options which are not that technical
| CMS | Website Builder | |
| Example | WordPress.ORG, Joomla, Drupal | WIX, Weebly , Shopify |
| Type | Self Hosting | Total Hosting |
| Technical | Learning Curve | Drag & Drop |
| Designing Freedom | Better Control | Least Control |
| Cost | Annual Cost | Function Based Costs |
| Applications | Unlimited | Limited |
My Verdict:
Website Builders are very easy to build by drag & drop facility , CMS though not technical have a bit of learning curve but in the long run one gets used to it & that’s why i prefer the freedom provided by CMS which vastly overshadows any initial benefits provided by drag & drop Website builders.
My Second Verdict for CMS:
Market leading CMS include WordPress.ORG, Joomla, Drupal and many more. Amongst CMS wordpress has 60 % market share whereas the other two combined have about 10% . Joomla is a bit more technical & Drupal is more suited for corporates. Enough reasons to go ahead with WordPress.ORG.
Build Your Own Website
If you face any issues while following the below steps you can reach me out at Facebook or Instagram Or drop a mail at [email protected]. I would help you out for Free cause I Am The FREE Bird.
Based on the above vedicts we can build a simple website in no time with a CMS like wordpress.org.
Things that you will find here:
-
- What are you going to blog about
- Selecting Domain Name
- Finding Hosting
- Get Acquainted with your website
- Designing your website – Themes
- Plugins – Apps for website
- Creating Content
- Good to know stuff
Lets Get Started
1. What are you going to blog about ?
The basic question arises is what to blog about. Eg. your blog cannot be about mobile features one month and next month its about new vehicles i.e. You can blog about only one thing in a blog. This helps to maintain a certain audience level without they getting confused. This also helps google, bing and likes to keep track of your website and help building a greater value for a particular niche.
Selecting a blogging topic:
- Blog about something you like , something you are interested in , else it becomes boring after a while. To really succeed in blogging your blog journey needs to be consistent over 3-4 years hence it is necessary to blog about your favourite topic, hobby
- Your blog should give a new angle to what other bloggers discussing on the same topic
2. Selecting a domain name:
Domain name is the name of your website like www.Facebook.com , www.Google.com, (my) www.TheFreeBird.net. There are few top level domain names like .Com & .net which are most popular & i would suggest you buy a similar domain name. There are thousands other like .co, .co.in, .org, .info etc which dont have that much recollection.
I would suggest you buy independent domain names from GoDaddy. Hostings which we will discuss after this like Bluehost also provide a free domain with the hosting but if you prefer to buy domain names long before buying hosting you can do so from GoDaddy.
Centuries Ago: What’s in the Name !?
2018 Blogs: “Everything“
Points for selecting the domain name:
- The name should be short & sweet . It should have easy recollection
- Try to avoid common words Eg: if you want to blog about travelling avoid Wanderlust, TravellerXYZ, TravelWithXYZ, Nomad etc. There are too many well established names out there and you will look as a cheap rip off.
- Choose a name that will serve your moto throughout the coming years . Eg: If you start as ” HimalayanTrekker” and start doing more local travel blogs that would go aginst your name.
- Go for .com & .net domain names , others are easily forgotten.
- Check if the domain name is available for social handles on Facebook, Instagram, Youtube, Twitter etc.
- Try to add a keyword in the domain name. Eg If you are in scuba diving you can be BlueScuba.com. This helps google to give you good traffic on your website
- Check if similarly named websites already exist. If yes avoid such names. Check your competitors website names.
- Avoid two-word names where the last letter of the first name & the first letter of the last name are same Eg: Wild Drive – Wilddrive.com
- Creating a brand. Names like google, facebook, ola etc dont have a well known meaning. But after they become brands it doesn’t matter. So if you could come up with some tasty new words of your own. Nothing like it. Plus such domain names come cheaper.
- For the initial days you dont need to but all the available versions of your domain names. Eg WebsiteName.com , WebsiteName.net ,WebsiteName.co.in, WebsiteName.co , WebsiteName.info etc . You might feel the other domains should be reserved in case you get famous. But it takes time. I had bought 6 extra domain names at the beginning for which i paid a lot of money & eventually I ended up giving them up.
Take out a piece of paper or notepad and based on the above points jot down what your domain names should be. You can check availability of your domain name here
Bro Tip:
Even if you reading this just to build your website in the future. I would suggest atleast buy & book the domain name as soon as possible. Domain names are in very high demand , something which is available today may not be available tomorrow.
As the Great EMINEM once said
You own it, you better never let it go. You only get one shot, do not miss your chance to blow. This opportunity comes once in a lifetime
3.Selecting Hosting
Hosting is the place where all the website data & code will be stored. It is very essential to select hosting which has very less downtime , so that your website is available 24/7 & has very good service to keep very fast response time which will help in quick loading for the website.
There are many hosting options in the market like Bluehost , SiteGround, Hostgator, Dreamhost.
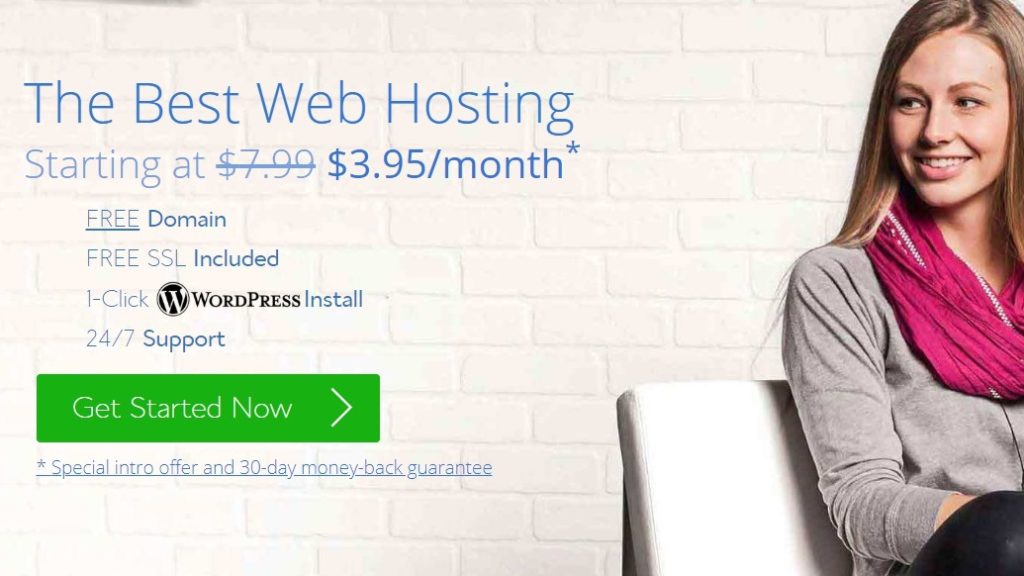
I use & recommend Bluehost. Also Bluehost hostings are officially recommended by WordPress

There are two options from Bluehost- Indian servers & US servers which are handled by totally different companies with the same name. My choice is Bluehost USA which also provides free domain name & is much more professional & cleaner than the counterpart. All the Bluehost links on this page are for bluehost USA servers 🙂
Walkthrough for setting up your website on Bluehost
Step 1: Click here to go to Bluehost website. Select on Green button to get started
Step 2: Select a plan
For starters select the basic plan , that’s all you need. Even if your website requirement increases suddenly, bluehost provides upgrade options wherein you can pay incremental prices. But that wont happen atleast for 3 years.So no need to invest high amount right now. Go for the basic plan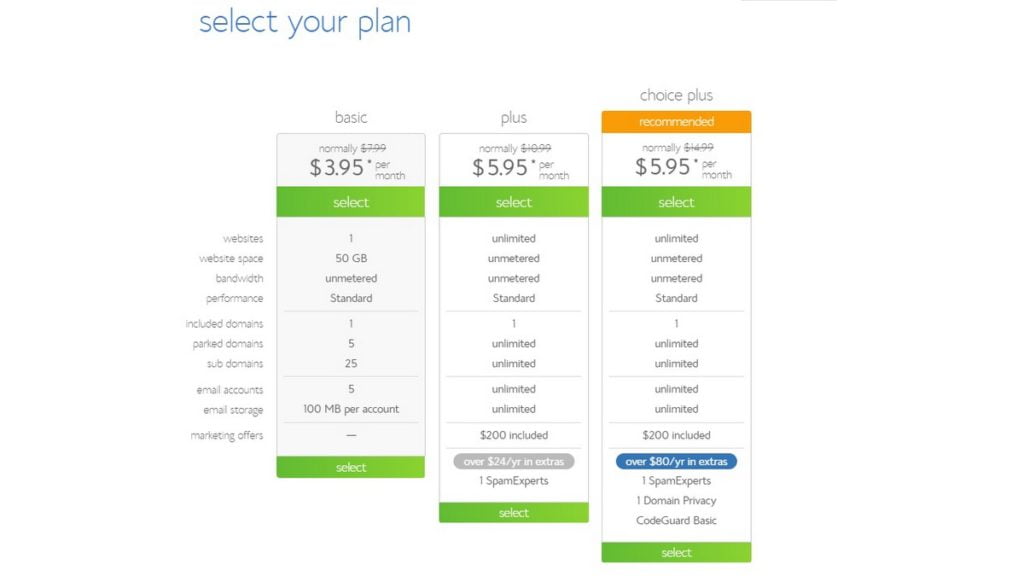
Step 3: Select Domain Name
As you had already done your domain research in point 2 above, you either bought one or you will buy new domain name now. Based on that fill the domain name in either of the options and select ‘next’.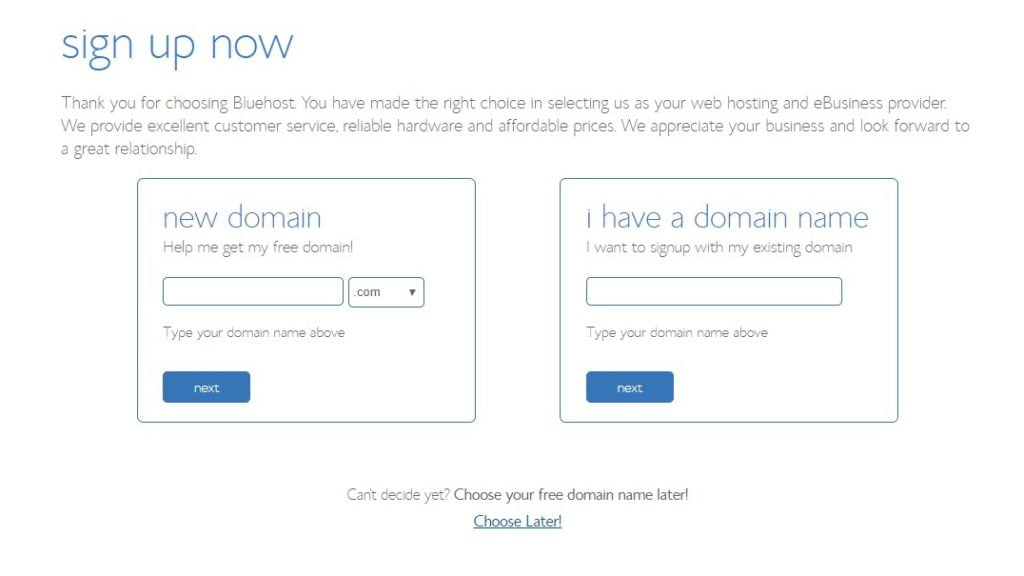
If you have an existing domain name you can select ‘Choose Later!’ to avail a free domain name later.
Step 4: Buying Hosting
Enter your account details and select the package you want to avail. Options available are fpr plans 1, 2,3 & 5 years. I would suggest 3 year plan.
Bro Tip:
The first time you buy Bluehost hosting you get a discount being a new buyer, however when you rnew you have to pay the full amount . i.e discounted few for first time buy will be 4 $ per month while renewal will be 8$ per month.
- Buy for one year now & renew next two years: 4 $*12 mnth + 2 years * (8 $*12mnth)= 240 $
- Buy for three years at discounted rate for 3 years= 3 years* ( 4$ * 12 months) = 144 $.
i.e. If you buy directly for 3 years at the start you save almost 100 $ over three years.
Hence i think you should opt for 3 year plan from the start itself.
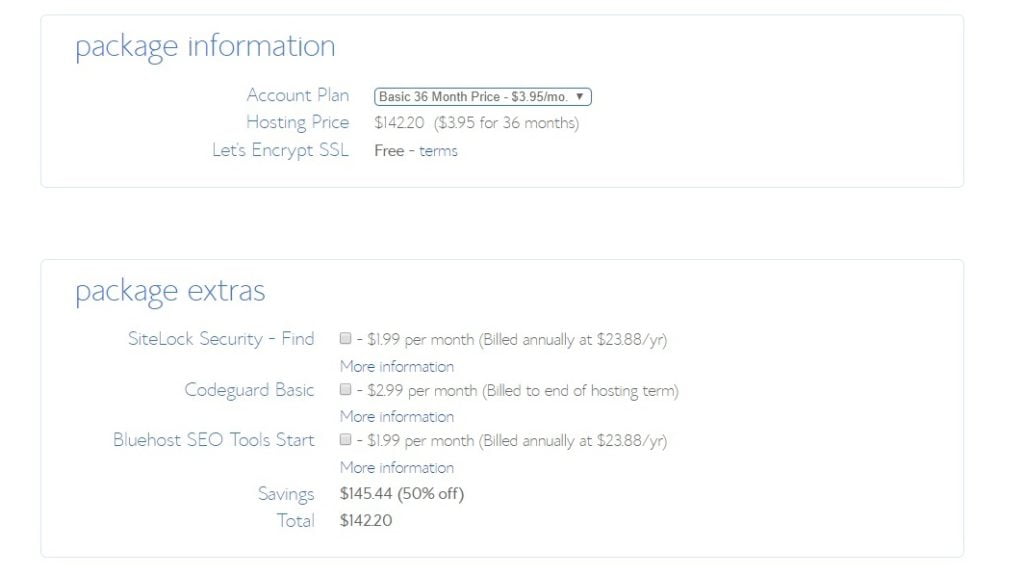
From the package extras select what all you want. I would suggest uncheck all these & add payment details and submit.
Step 5: Bluehost password Creation
You will asked to create a new password and will be asked to select a theme. This theme can be easily changed later on.
Note: This password is for Bluehost & not for your website admin, which we will come to later on.
Step 6: WordPress Installation
Login to your Bluehost account & do the One-Click WordPress Installation. Scroll down on your bluehost account and find the button
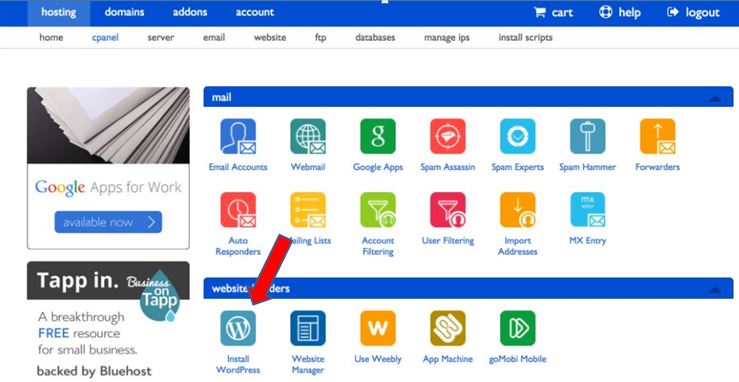
Select & click install
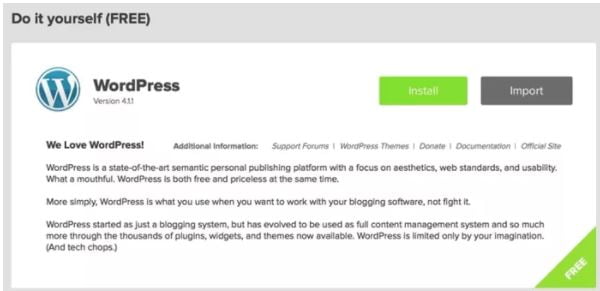
Select your domain name & click ‘ check domain’

Fill in the proper details in the next page like username, password & you are ready to complete installation. Tip : Dont keep your admin name as “Admin” or your name, this improves security
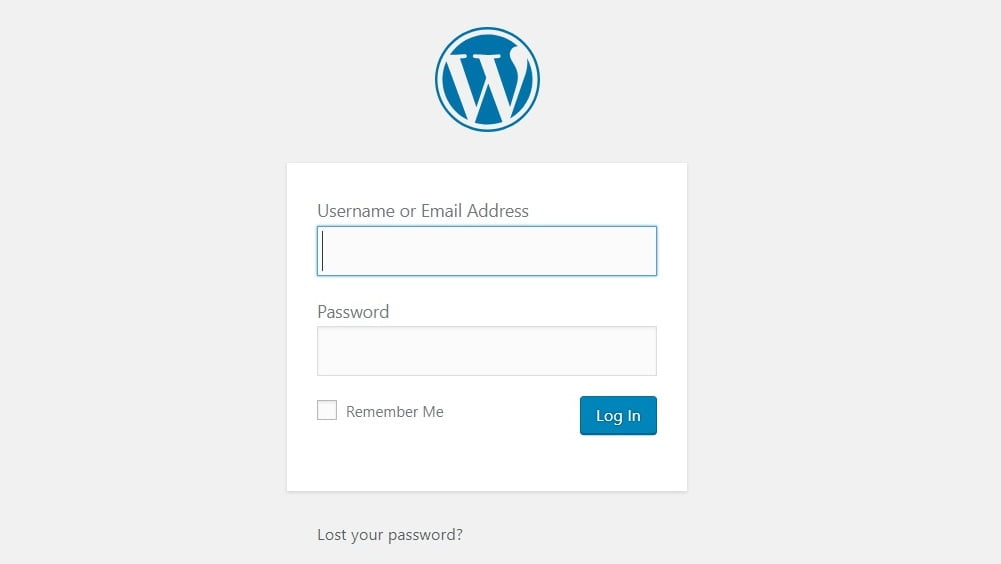
Step 7: Login to your website.
With the username & password created earlier you can now login to your website through
http://www.yourdomain.com/wp-admin.
Bro Tip:
- If you have chosen a new domain name, your blog may show up temporarily. It’s NOT an error
- It can take a few hours for a host to point to proper server. Bluehost will automatically fix the domain as soon as it’s ready.
In case you have bought domain name from GoDaddy, you can manually change settings for bluehost to communicate with the new domain.
Go to GoDaddy > Domain Manager > Select Domain > Manage DNS > Custom Nameserver
Now change the nameservers to
- NS1.Bluehost.com
- NS2.bluehost.com
This will take upto 3-4 hours to reflect . Once done we are ready to access your website .
4.Get Acquainted
Once you are able to login to your website as admin, the next step is to select the theme. First lets get aquainted with few things.
- Appearance: Choose new themes or edit the one you have.
- Posts: This is where you write blogs . All the efforts are for this.
- Pages: Create static pages
- Media: You can add pictures here which will be shown throughout the site.
- Comments: Manage the comments which you get
- Plugins: Add and remove plugins. This is just like different apps you get on mobile but this for your website.
5. Selecting Theme
Themes decides the appearance of your website i.e. the look and feel of your blog. Go to > Appearance > Themes to browse thousands of free/paid themes . You can select the live preview on particular themes to see how they will appear . Install/Activate the theme which you like the most.
There are many themes that can get you confused. Here are few which are the most sought after paid themes.
- Elegant Themes
- Theme Forest
- Optimize Themes
6. Plugins
Plugins are apps that you add on your website. There are thousands of plugins to choose from. You will learn about these plugins slowly and steadily over your blogging journey. For the time being i would suggest you to add the following plugins:
- Yoast SEO – OPtimising your website SEO for Google/ Bing
- Updraft Plus – Backup your website data
- Akismet – Protects blog from spammers
Try not to add a plugin for every other thing because it slows down the website. 🙂
7. Creating Content:
Pages & Posts are the blog data that you create. Posts are the ones which show up on default wordpress home pages in reverse order of creation date. Pages are the one-off static pages which dont feature on the home page & have to be specifically invoked by providing there links in the menus. So apart from the few pages mentioned below you would be always creating posts.
Common pages which are added to the website are About, Contact, Privacy, Disclaimer etc.
Few common terminologies to help you with content making:
- Add media- to add images to your post/pages
- Publish – to make post/page visible on website. It wont be available on the website till then it will remain in Draft
- Category- it is used to create grouping. Like you will see travelblog on this pages link
- Tags – Are like hastags which reader can use to navigate across the website.
Equipped with this knowledge you can now start writting the first blog. Once you are done do let me know I would be very happy to read about it 🙂
8. Other Stuff
Few other helping points you might want to try over the days:
- Add a new logo to the site header. Read more on Header/ Footer
- Customize your site’s menus.
- Change the default font
- Add some dashboard widgets.- The section on the right side of my blog
- Set up Google Analytics to track the website visitors
- Start your website’s social handles
- Convert the website to SSL approved https://
Remember, most of the things on your blog are customisable. Just google it and you will have an answer.
You are now ready with a blog .With a creative mind you can now start blogging & follow your dreams.
Making Money
The most important thing is how to make money from blogging. If you are into travel blogging you can learn it from the Godfather of travel blogging himself – Nomadic Matt
If you liked this very long post I would be very happy. You can now open that beer bottle, you have earned it.
I am an adventure blogger and you can have a look at my adventures here.
Do follow me on Instagram as I share my latest adventures over there.
[instagram-feed]
Hope you enjoyed reading this post.
Here is a list of all my adventures
I am always in search of offbeat adventures. You can connect with me on Facebook , Instagram and Twitter. Also I put lots of efforts in my YouTube videos, make sure to have a look and subscribe to my channel.
To get regular updates on upcoming blogs please join my email list by entering your E-mail address in the Newsletter below.


Bloggers are actually like free birds as they can work on their own terms without depending on someone except Google, Lol. Your domain name looks catchy. As a recommendation, you can include both GeneratePress and Kadence in your ‘Selecting Theme’ section. Nice Read.